Guide

How SavorDesk works

Everything you can do, step by step, with a short video for each part.

⬇ Download the one-page Quick Start (PDF)

Get started

Four steps to go from sign-up to your first client week.

1. Set up your business with the AI assistant

  1. Paste your website link, a price sheet or a few lines about what you offer.
  2. SavorDesk's AI assistant drafts your packages, prices and tagline. Review them, change anything, and save.
  3. You can edit packages any time in Settings.
2. Bring in your clients

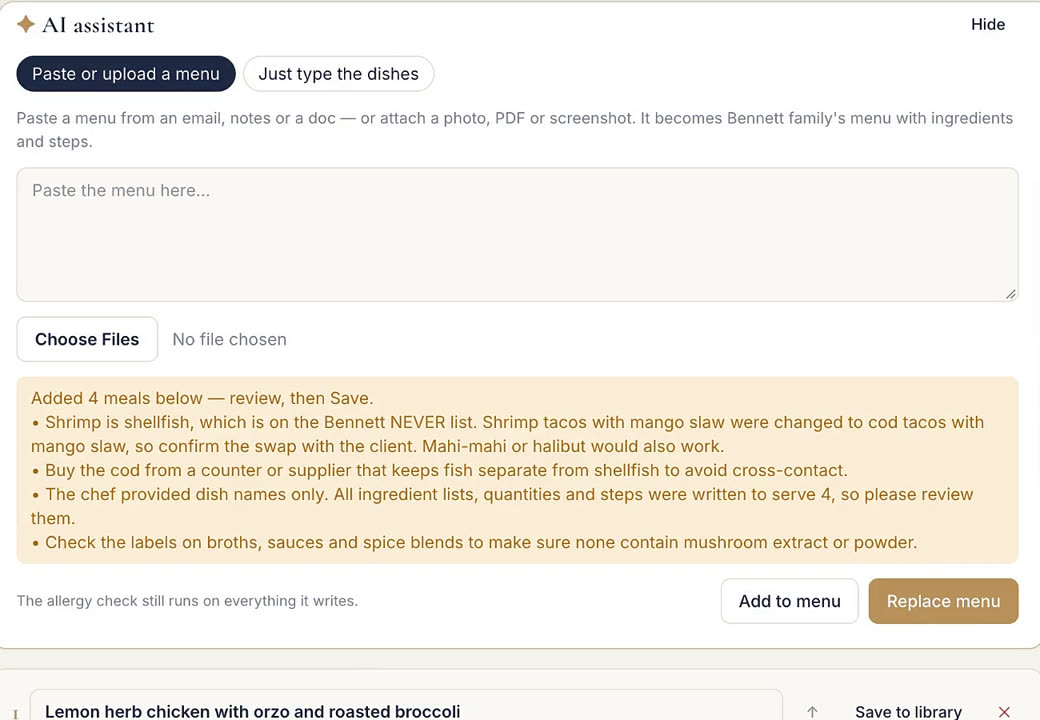
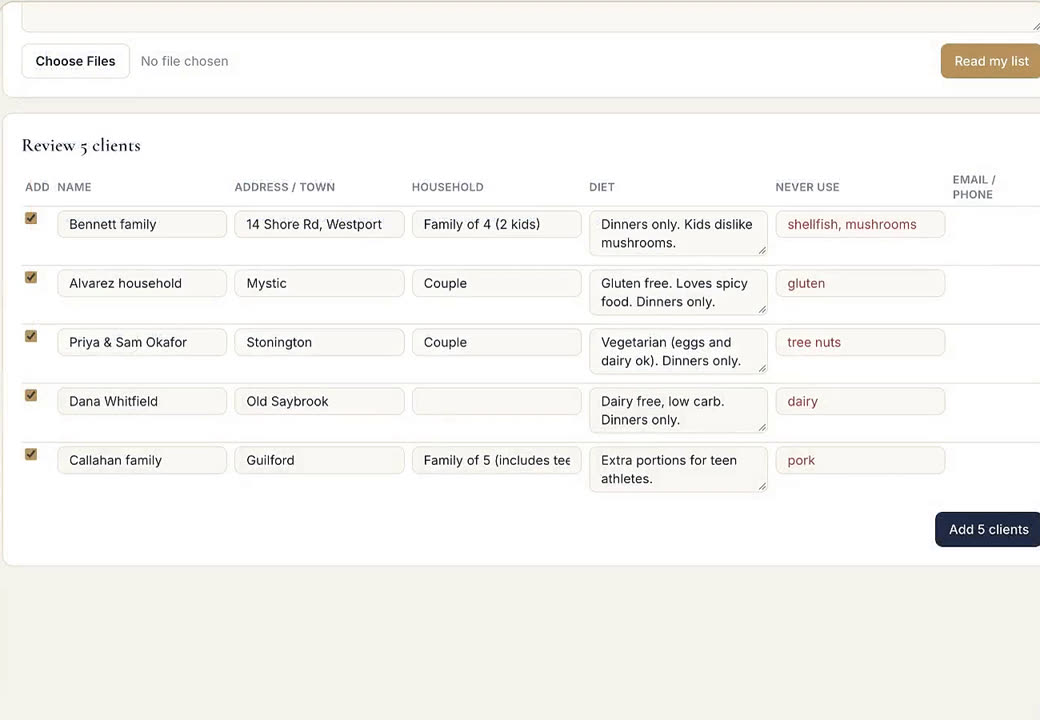
  1. Paste a spreadsheet, notes or even a text thread. The AI assistant turns it into client profiles: household, servings, allergies, dislikes, address and drop-off day.
  2. Or add clients one at a time from Clients → New client.
  3. Allergies and things to avoid are checked against every menu you write.
Client profiles with diet notes and a never-use list

3. Invite clients

  1. Open a client's page. Send the intake form so they fill in their own details and food preferences; nothing they leave blank erases what you already have.
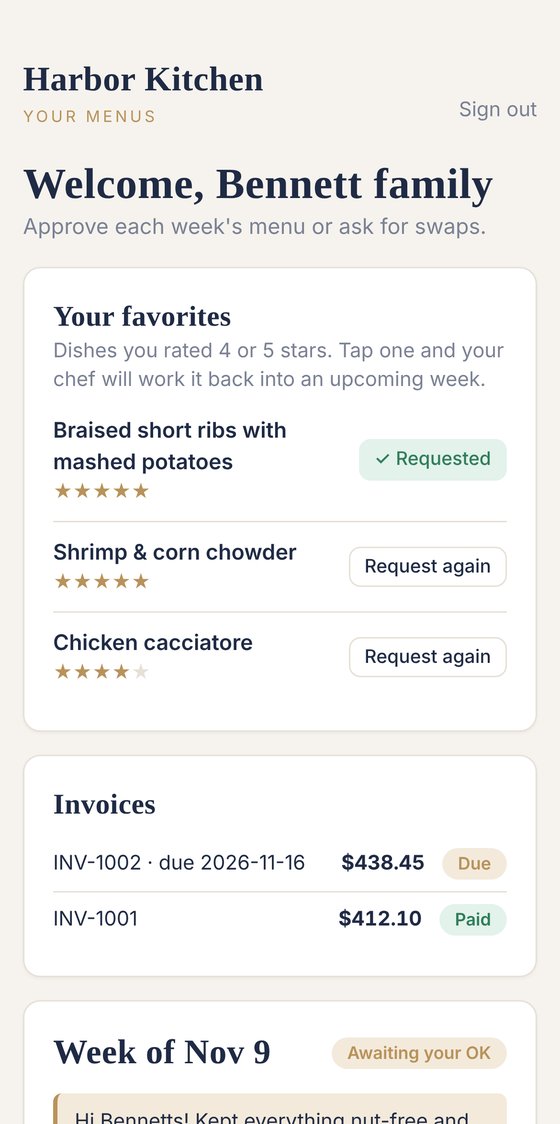
  2. Send the portal invite so they can see menus, approve or ask for swaps, rate meals and request favorites. Clients sign in with an emailed link, no password.
The client portal

4. Connect Stripe to get paid by card

  1. Go to Settings → Card payments and click Connect Stripe.
  2. Stripe opens in a secure page. Sign in if you already use Stripe, or create a free account with your email.
  3. Choose your business type: most solo chefs pick Individual / sole proprietor. If you have an LLC, choose Company and use your EIN.
  4. Enter your legal name, date of birth, address and the last 4 digits of your SSN (or your EIN). Stripe asks for this by law to verify who gets paid; SavorDesk never sees or stores it.
  5. Add the bank account where you want payouts, then finish. You'll come back to SavorDesk automatically.
  6. When Settings shows "Clients can pay invoices by card", you're live. Every invoice gets a Pay button, including Apple Pay and Google Pay.

Money goes straight to your own Stripe account and pays out to your bank on Stripe's schedule, usually within a few business days. Stripe's standard card fee applies; SavorDesk takes nothing extra. If it says "Finish Stripe setup", Stripe still needs a detail. Click it to pick up where you left off.

Your week

The weekly loop: menus, groceries, cook day and getting paid.

Grocery lists

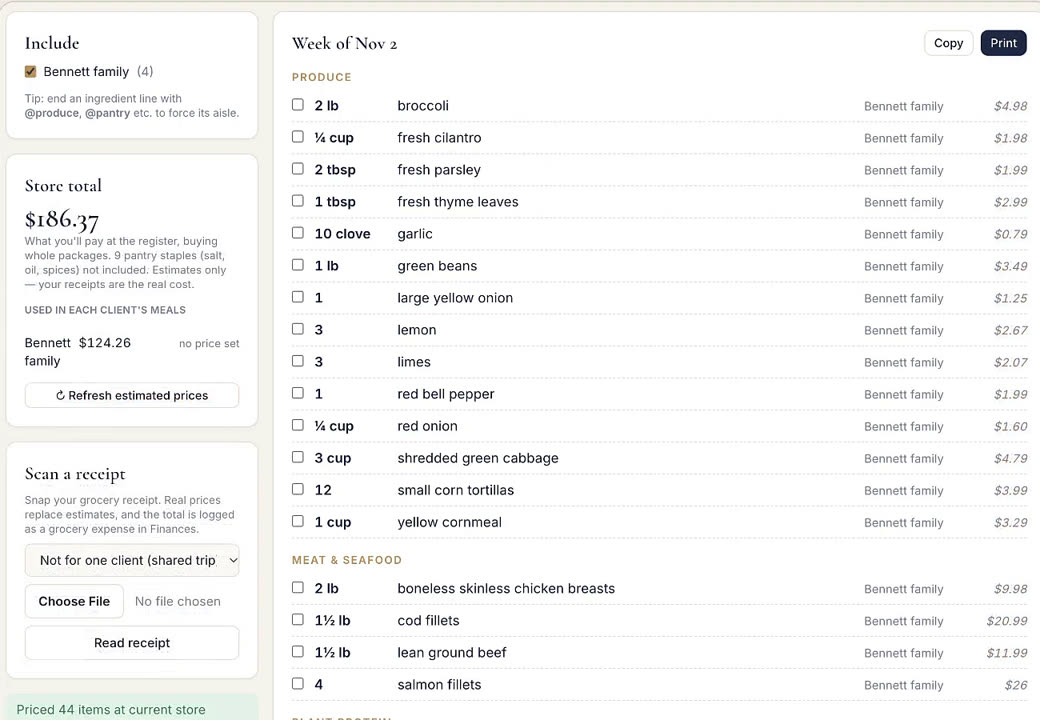
  1. Every approved menu for the week rolls into one grocery list, merged and grouped by store aisle.
  2. Prices are estimated by package size, so the total matches what you'll pay at the store. Pantry staples like salt, oil and spices are left out of the total.
  3. Working to a client's grocery budget? Check the estimated total before you send the menu, and swap a dish or adjust portions if it runs over their range.
  4. Force an ingredient into an aisle by ending its line with a tag, like "2 lemons @produce".
  5. Clients who buy their own groceries: tick "Client buys their own groceries" on their profile. Each week, send them a shopping list from their menu as a checklist they tick off in the store. Their invoices leave out groceries.
A weekly grocery list sorted by aisle with estimated prices

Recap sheets and container labels

  1. Print cook-day sheets with every client's dishes, ingredients and allergy flags.
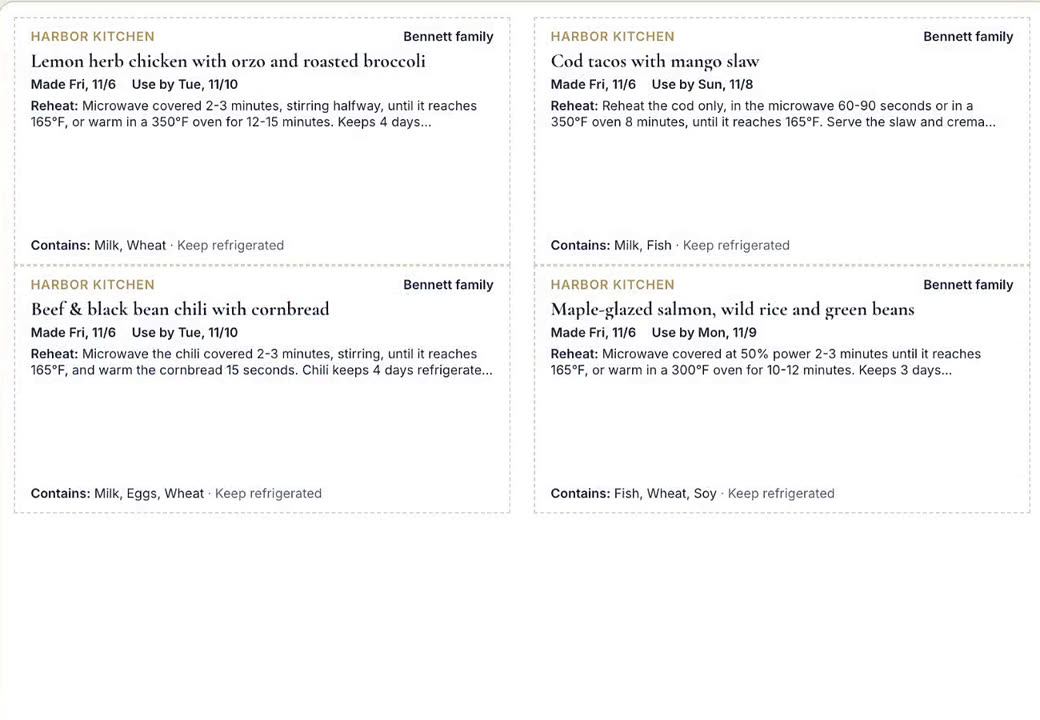
  2. Print container labels from Recaps or a menu. Click Customize labels to choose your sheet (11 common Avery sizes from 2 to 30 per sheet, including 8- and 12-up, squares and rounds, or enter any custom size), what each label shows (logo, dates, reheating, allergens, ingredients, nutrition) and your footer line, then save it as your default.
Printable container labels with dates, reheating and allergens

Ratings and favorites

Pro plan
  1. After delivery, clients get a "How was this week's food?" email and rate each dish.
  2. Dishes they love show up as favorites on their client page and in the menu editor, and clients can tap "Request again".
  3. Save your best dishes to Recipes to reuse them in any menu.
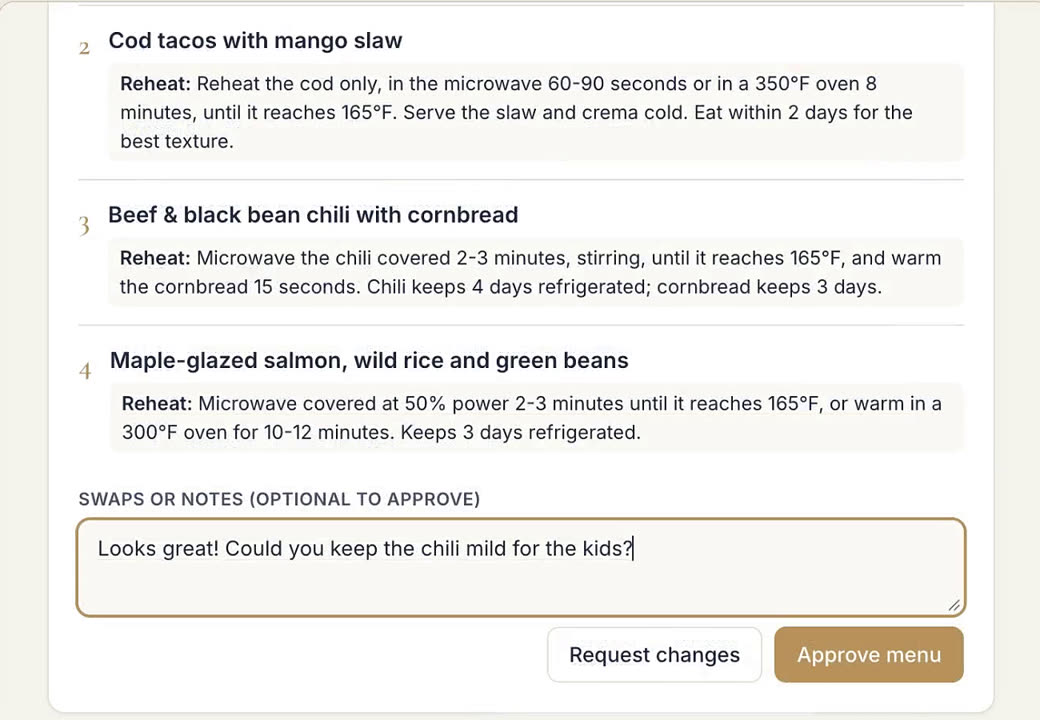
A client approving their weekly menu

Invoices, receipts and auto-pay

  1. Create an invoice any day, or let SavorDesk draft weekly invoices from each client's package automatically (Settings).
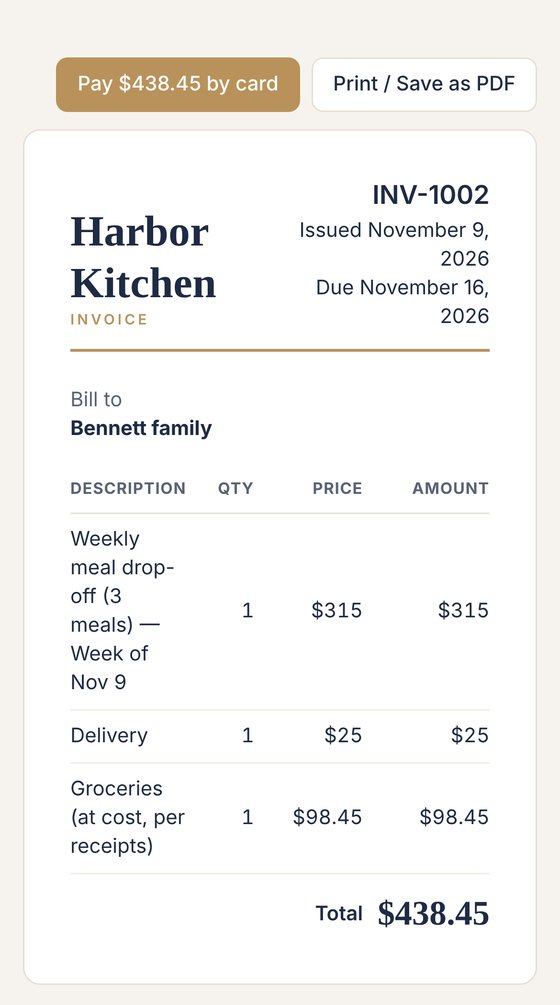
  2. Attach photos of grocery receipts. Clients see them on the invoice page.
  3. Overdue invoices get a polite reminder email once a week.
  4. Venmo, Zelle and Cash App: add yours in Settings. Invoices get a Pay with Venmo or Cash App button with the amount filled in, and your Zelle details to copy. When a client taps "I paid with Venmo", you get an email; check the app, then click Mark paid.
  5. Auto-pay: clients can save a card from their portal, and new invoices are charged automatically when you send them. Requires Stripe (step 4).
An invoice with groceries filled in

Grow your business

Win new clients and keep everyone in the loop.

Announcements

  1. Email all your clients at once about holiday schedules, price changes, new dishes or a week off.
  2. Jot down the facts and tap "Help me write it" to have the AI assistant tidy it up, or write it yourself.
  3. Send to current clients, everyone (including past clients) or hand-picked clients. Replies come straight to your email.
  4. Every announcement has an unsubscribe link. Clients who opt out still get their menus and invoices.

Inquiry page

  1. You get a public page at savordesk.com/i/your-link with your packages and an inquiry form. Put it in your Instagram bio and on your website.
  2. New inquiries land in Inquiries and in your email.

Proposals and contracts

Pro plan
  1. Turn an inquiry into a priced proposal from your packages in about a minute.
  2. Send an agreement to sign online. You both get a signed copy.

Order form

Pro plan
  1. Add products (trays, baked goods, à la carte meals) and share your order link at savordesk.com/o/your-link.
  2. Orders come in with quantities and totals; customers get a confirmation email.

Finances

Pro plan
  1. Track income, grocery spend and other expenses, and see what you actually earn per client.

Your logo and colors

Pro plan
  1. Upload your logo and choose a brand color in Settings. They appear on your client portal, invoices, proposals, contracts, labels and emails, and the small "Sent with SavorDesk" line comes off.

Done-for-you setup

  1. Rather not do the setup yourself? Send us your client list, menus, recipes, price sheet and logo, and we'll set up your account for a one-time fee.
  2. We only work inside your account with your permission, you can remove it any time, and it's removed automatically when we finish. Billing and Stripe always stay with you.
  3. Want a simpler menu? Settings → Customize your workspace hides any sections you don't use.

Team seats

Studio plan
  1. On Studio, share your team code so sous chefs or assistants can join your kitchen with their own login.

Try it with your own clients

Every feature free for 14 days. No credit card.

Questions? Email support@savordesk.com. A real person answers.